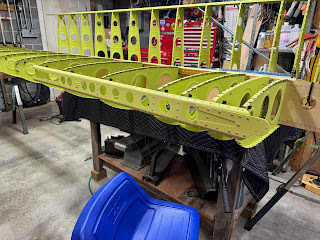
Started today with riveting the front spar to the left wing assembly. Easy peasy.
Friday, May 10, 2024
Wings part 19
Then installed the snap bushings in the nose ribs.
Then dimpled the rib flanges on the two ribs that sit under the wing walk doubler. This is so the wing walk anti slip material sits flush on the skin.
I then installed the nose ribs, front spar and the snap bushings on the right wing assembly. I also had to fix the root rib due to my mistake a few post back where I put the nutplate and doubler on a rib that had not had the nose flanges trimmed.
Next is the wiring, stall warning switch, and AOA prep.
Thursday, May 9, 2024
Wings part 18
After reworking all of my mistakes on the nose ribs, (see prior post) I managed to complete the riveting of the nose ribs to the left wing spar. Make sure you don't forget to use the longer LP4-4 rivets on the rib flange to spar connections!
Wednesday, May 8, 2024
Wings part 17
Got started today by riveting the aft ribs to the left wing main spar.
After disassembly and deburring, I riveted the rear spar to the aft ribs. Pay attention to the rivet call outs as some are longer than others and some are countersunk flush rivets.
Next I riveted the aft ribs on the right spar. Some of these are a bit different as they get attached to the angle and the flange gets attached to the spar web.
Monday, May 6, 2024
Wings part 16
Started today by making up all the ribs that have some special parts attached or match drilled.
The two wing root ribs get these nut plates. Make sure they are on the correct side of the web. UPDATE: I made a mistake and installed two nut plates in each rib here. The plans only call for one. Don’t do what I did! Updated #2: I put these nuplates on the rib that was untrimmed at the front! I must have been drunk and rusty at building when I did this. This root rib must have the front nose flanges trimmed! Don't do what I did!
They also get these two doublers. I think the nut plates are for the electrical grounds and the doubler is for the electrical connector. UPDATE: I made a mistake and installed two nut plates in each rib here. The plans only call for one. Don’t do what I did!
Then this solitaire rib gets two nut plates on the tip for the AOA sensor. UPDATE: Yes this one is supposed to get two! Update #2: Notice that I put these two nutplates on a rib that had the front flanges trimmed. DUH! This is a mistake.... Don't do what I did!
Matched drilled these rib extensions. Pay attention which rib you match drill to, these extensions are different.
All done and riveted. Plans tell you to put shop heads on a particular side of the web.
Sunday, May 5, 2024
Wing rib prep -15
It was a miracle but after working at my real job all day I managed to get the remaining wing ribs primed.
That was way too many parts to prep and prime all at the same time. To say it sucked is an understatement.
To increase the difficulty, I was dodging rain showers as well!
Subscribe to:
Comments (Atom)


