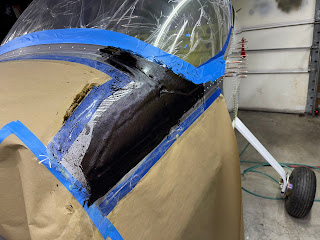
Layed up the fiberglass for the canopy frame arms.
First layer was wetted out with black tinted resin. I then let that layer gel up to tacky before applying and wetting out the remaining 4 layers with clear resin.Saturday, November 23, 2024
Monday, November 18, 2024
Canopy Fairing Part 5
Then I used the provided final trim template to layout the path for the electrical tape layers that will form the edge of the canopy fairing to plexiglass transition.
I used red high quality 3M tape for the first layer.
I then proceeded to cut out the glass for the 5 layers on each side that will cover the canopy frame arms.
I used a rotary fabric cutting knife and a piece of 2'X4' luan plywood as a cutting surface. It took me some time to relearn how to deal with this fiberglass cloth. It is very easy to shift the fibers and end up with something that does not look anything like what you cut out. It is also easy to have the edges start to unravel and end up with a fuzzy mess.
Sunday, November 17, 2024
Canopy Fairing Part 4
Next I used the scraps of foam and some other rigid foam I had to form fillers for the gaps above and below the canopy frame arms.
Saturday, November 16, 2024
Canopy Fairing Part 3
Rinse and repeat on the other side.
Then they have you create this relief in the top edge of the foam blocks to provide space for some epoxy and flox and epoxy as a reinforcement. This will give the top layers of fiberglass to have a direct connection to the canopy frame arms.Thursday, November 14, 2024
Canopy Fairing Part 2
Once the epoxy cured, it was time to shape the foam blocks.
I used a long plank of plywood with the sandpaper spray glued to it.The instructions say to make the foam's contour match the sides of the fuse and top skin by using mostly fwd/aft strokes of the sanding block.
Wednesday, November 13, 2024
Canopy Fairing Part 1
Finished masking off anything I did not want epoxy to stick to. The epoxy is incredibly strong and almost impossible to remove even from a surface that is not prepped. Do a good job here to save time later!
Next was to start fitting and shaping the structural foam blocks supplied in the kit that fill the area outboard of the two canopy frame arms that come forward to the hinge screws. An angle has to be cut on them so they nest in the arms properly. Marked them per the directions.
Then using the indention made by the pivot screw head, use a unibit to cut the 1/2" hole for the pivot screw. Make sure you drill the hole perpendicular to the arm where the screw threads into.
Tuesday, November 12, 2024
More canopy fairing prep
Next is laying up several more layers of Duck tape to the top of the side skins. This has to be thicker to allow separation of the fairing from the side skins.
Also had to draw a line that will allow me to cut the fairing off even with the bottom of the canopy side skirts later. I was having trouble with the plans as it just said mark the line at dimension "Y" but they did not give you a dimension for "Y". Then it hit me..... the dimension you use is not important. Just remember what it is and then you can mark the fairing and cut it.


